Tuesday, July 2, 2013
Blog Frustration...
Hey all... I know I haven't posted in a while, but I have good reason. I can't download my photos ever since blogger updated. Frustrating! I will try and have this worked out in the near future. In the meantime, my summer is pretty hectic and kid oriented... as it should be. =) Hope you are staying cool in this wonderful summer heat!
Thursday, May 30, 2013
Trip Down Memory Lane

Just de-junking my archives... when I stumbled upon this little gem! Before I had my blog up and running, my daughter (then 6) helped me make this quilt for her kindergarten teacher. She colored the pictures and picked out the fabric... and did a FABULOUS job! Meandering in the pictures and scrolls in the borders and sashing. So super duper cute! And so is the quilt. =)
Monday, May 20, 2013
"LOVE" the Lines!

This is one of my favorite modern machine quilting patterns. So simple and fresh. I have made several of these Tula Pink "LOVE" quilts and this is my favorite way to quilt it. It compliments the modern look of the quilt. This particular one is being sent to my cousin, Kellie. I hope she loves it as much as I do! =)
Friday, May 17, 2013
Ele-fun-t!

The all over wavy crosshatching pattern was requested for this baby quilt. I think it looks very sweet and compliments the nursery look.

This little guy will probably make another little guy very happy!

Minky on the back...
Friday, May 10, 2013
Hip To Be Squares!

The front of this quilt was a bit too busy to see the quilting... so just the back today. Squares are super simple and requested often for mens quilts.
Tuesday, May 7, 2013
Bubbles!

This was a fun pattern to quilt... very relaxing. I love the simplicity of the bubbles. I think I will be using this pattern on a future summer quilt for my wall?!

And a veiw of the back.
Friday, May 3, 2013
Homemade Bubble Jet Set Solution Tutorial
I can imagine some of you asking, "What in the world is Bubble Jet Set Solution?!". In a nutshell, it is a treatment used on fabric to make it colorfast and printable. Now, why did I hunt this technique down in the first place? And why am I sharing it on my blog? Well, first thing's first. I think those of us familiar with store bought colorfast printable fabric know that it has the consistency of lightweight cardboard. Not something anyone wants to snuggle up to. Here is an example of a printing done on store bought colorfast printable fabric...

How wonderfully vibrant in color! However, this particular quilt top (made for my kids' preschool teacher) has twenty-four 4" x 5" blocks, which makes for a VERY stiff quilt. Bummer. I happen to have another photo quilt project I am working on and I wanted to find a softer colorfast fabric... enter Bubble Jet Set.
Now, Bubble Jet Set is the trademark name of the colorfast solution found on the Internet. It is also available in stores, but I have yet to find it where I live. It costs around $16.00 per 32 oz. bottle. It promotes colorfast fabric that FEELS like fabric. SQUEEEEAAAAL! However, I needed it sooner than later. Soooo.... I found several recipes on how to make my own Bubble Jet Set for a fraction of the cost. I bought what I needed (cost: around $9.00) and set up a chemistry lab in my kitchen. Bwahaha! And you know what? I am THRILLED with the results! So I had to share this infamous secret with you. On with the tutorial...

Most of the recipes I found had the exact same ingredients and amounts:
Homemade Bubble Jet Set Solution
2 Tbls. Alum (found in the spices aisle)
2 1/2 tsp. Washing Soda (found in the laundry aisle)
1/2 tsp. Liquid Fabric Softener (NOTE: THE GAIN
SHOWN ABOVE IS FABRIC SOFTENER, NOT DETERGENT!)
1 cup HOT tap water
large bowl
100% cotton fabric in white or cream
(FYI: It has been said in several articles that this solution
works best on 100% cotton fabrics.)
works best on 100% cotton fabrics.)
Mix alum, washing soda, liquid fabric softener and hot water together in a bowl big enough to accommodate your fabric. Let it settle for 15 minutes.

Stir again to make sure everything is dissolved. It should resemble the picture shown above. Dip and stir fabric with your hands to evenly coat the fabric. I played around with it for about 5 minutes.

Let fabric set for 15 minutes. Wring out the excess solution and save for later in a marked, air proof container. (A little goes a long way!) Note: The left over solution will seperate... just give it a good shake before you use it again.

Now that we have the Colorfast Fabric, let's see how well it works with printing!
Lightly press the treated fabric. Using a dry iron on a cotton setting, adhere waxed Freezer Paper (found near the Ziploc bags in the store) to the fabric. Cut 8 1/2" x 11" sheets out of papered fabric. Re-press to insure that the paper is firmly attached to the fabric, especially around the edges.

Now we are ready to print! You MUST use an ink jet printer. Laser printers will not work! Figure out the finished size you want your image to be and make allowances to that measurement for seams. Set your ink jet printer to Best print setting (if available). I suggest you use the original picture when copying, if possible. This insures the clearest printing. Or use a photo straight off your computer. Load the papered fabric into the printer like you would a normal piece of paper.

And here's Audrey in all her glory fresh off the press! While you can use color photos, black and white has much less bleeding and fading. Let the ink set into the fabric for at least 20 minutes. I left mine to set for half the day... only because a little thing called life got in the way! Sigh... Peel the freezer paper off the back of your printed fabric. Fill your kitchen sink with about 2 inches of luke warm water mixed with a small splash of liquid fabric softener. Liquid fabric softener works as a mild detergent. This step is a must if you want minimal bleeding and fading when/if you wash your finished project.

As you can see, up around my fingers, the extra ink is bleeding out. This is a good thing and to be expected. Agitate lightly through the rinse for a few minutes. I used the same rinse water for all four of my fabric sheets with no problems. My water was a very murky shade of grey in the end... but my pictures still look pretty amazing!

Place the fabric image side up on a towel. Blot fabric gently with a towel to absorb excess water.

With a dry iron on a cotton setting, gently press the fabric, image side up. This will evaporate any remaining water. Cut your images to the desired size. (Remember those seam allowances!) I am so pleased with my Audrey images! While the fabric isn't quite as supple as it was originally, it is pretty close. And a hundred times better than the store bought colorfast fabric sheets. And... my hands smell wonderfully like lavendar. Bonus!

Now you are ready to sew your customized fabric into something wonderfully unique and amazing! What am I going to do with my darling images of Audrey? Well... that's for another time and post! =)
Thursday, May 2, 2013
Love the Back!

I love how the back of this quilt showcases the quilting so well... so I decided to show off the back first. =)

Swirls with snowflakes here and there are quilted in the surrounding area of the quilt...

And large snowflakes and Cathedral Windows make up the middle. (There's those Windows again... can you decide if you see the window, 4 point flower or circle? Maybe all three?) =)

And finally, the quilt top! I love these Crab Apple stitching patterns. Sigh... I wish I had the patience to make one.
Feathered Flower
I finally remembered to take a picture of this all over Feathered Flower. This is one of my most requested designs.

Here's a picture of the back to show more detail.

Tuesday, April 23, 2013
Quilting Buzz

Ok. So I didn't get very many shots of this quilt, but I wanted to post what I had to show a few more designs. This quilt is made up of borders with a checker board center. In some of the borders, I quilted vines, scrolls and feathered flowers.
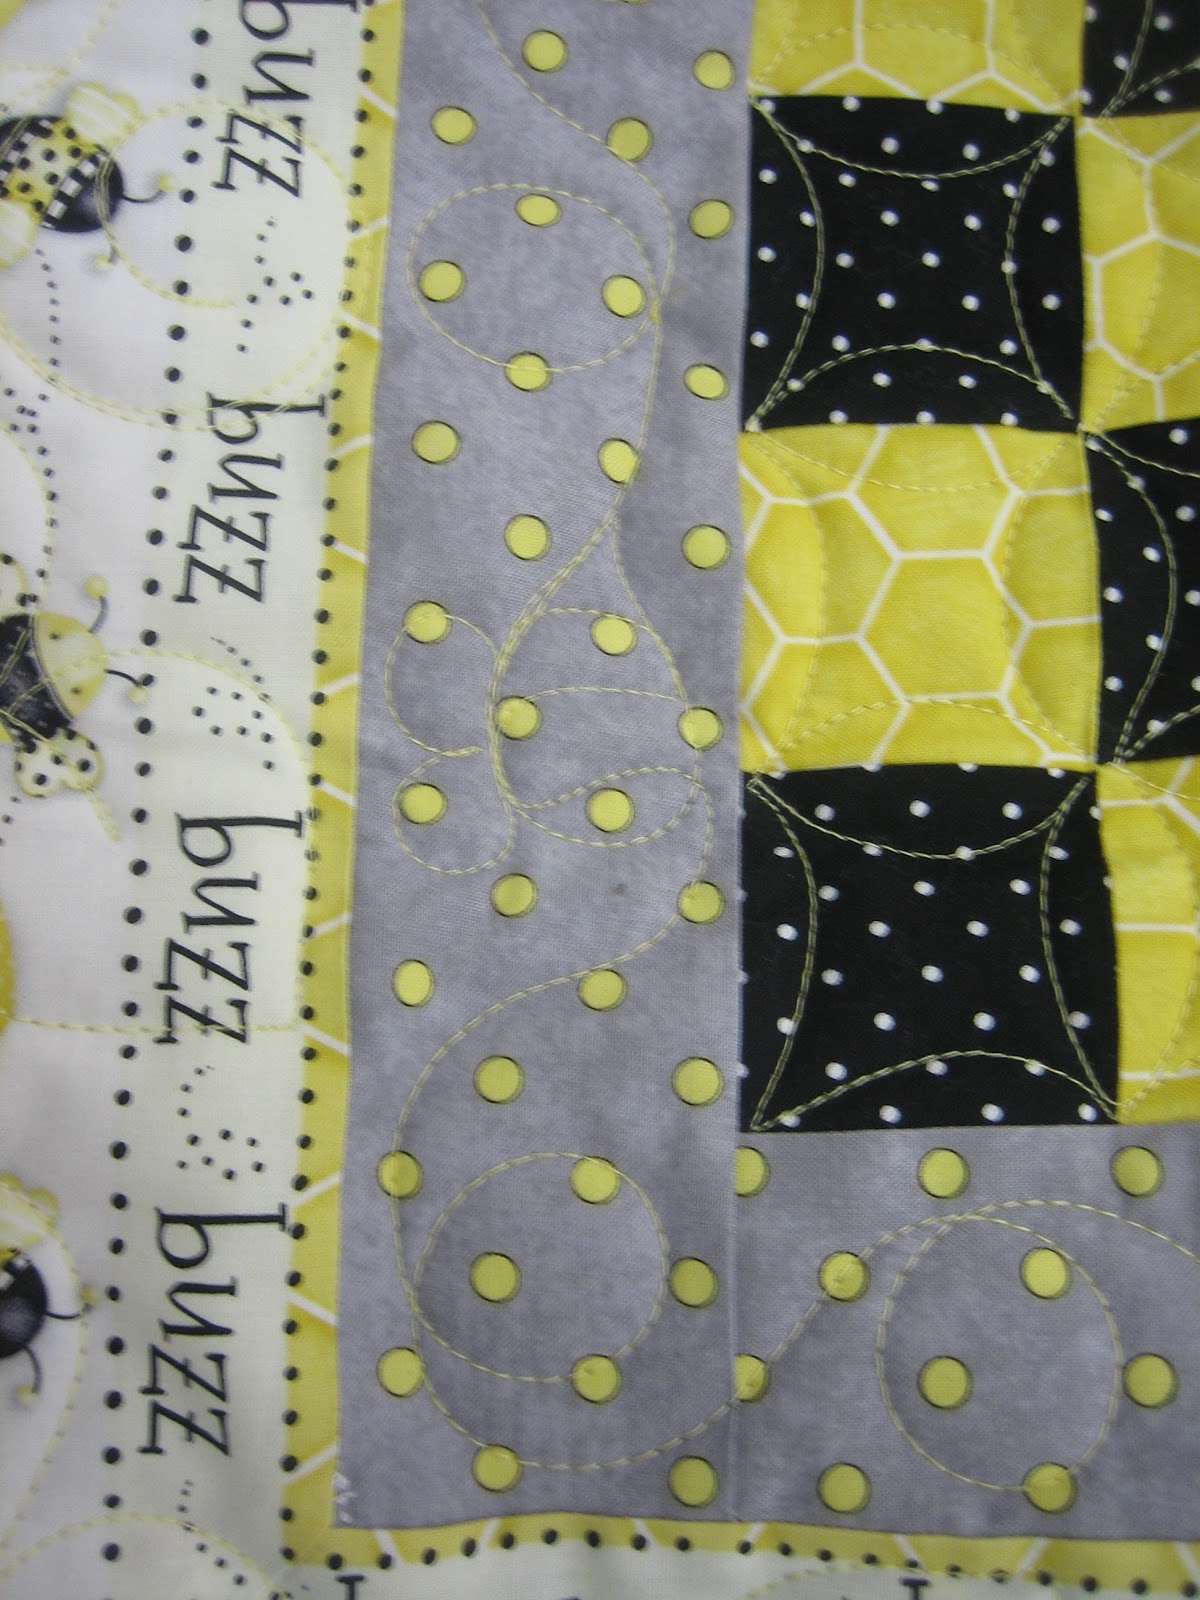
In a few of the two inch borders, I quilted bee's in flight. And on the checker board center and border, I quilted Cathedral windows. Question: Do you see the Cathedral window, the circle or the four point flower? Keep that question in mind... I'll try to post a better picture of Cathedral window quilting in the future. If you would like to see more of this quilt, it is hanging in Bernina for a few weeks.
Tuesday, April 16, 2013
Sooo Much Detail!

You may see this quilt hanging at Bernina in the next few weeks. What a fun quilt to make and machine quilt! The pattern is in the new Home to Roost book by Whimsical. The fabric is specifically made for the book, also called Home to Roost. Yes... this chicken quilt will be going to my grandmother when Bernina is finished with it. =)

This quilt was BEGGING to be quilted with lots of detail! Wavy lines and circular wood grain in the fence outer border, vines on the patchwork border and a simple loop on the inner border. The sun is made up of squiggle lines and stippling.

Wavy lines for the bordered panels...

Swirls in the pinwheels...

And my personal favorite... wavy crosshatching on the chickens! Finishing with a straight line on the roost and filling in the background with feathering. The more I quilt, the braver I get. =) I am pleased with this one, for sure!
Tuesday, April 2, 2013
It's all in the detail!

This is a quilt I quilted today. It has so much fun detail, I don't know where to begin!

On the outer border and in the white Cathedral Window blocks, I quilted a wavy line cross hatch. I think the wavy line cross hatching adds a very feminine touch. I quilted banner lines in the scalloped border and in the colored scallops on the White Cathedral blocks. A leaf vine and a scroll make up the inner borders.

In the colored Cathedral Window blocks, I quilted an 8 petal medallion with a squiggle line in the white scallop bordering it.

Minky on the back showcases the quilting quite well. I have to say, I am very pleased with this one. =)
Monday, April 1, 2013
All Over Feathering

Every spring, I make my grandmother a chicken themed quilt. This years quilt reminds me of our kitchen when I was a little girl... sunflower yellow, avocado green and brown. Oops... I think I just aged myself. =)

I chose to quilt an all over feathering pattern. I wanted the appliqued chickens to lay uniform with the rest of the quilt... I like how the feathering blends into the chicken. I was skeptical about how it would turn out, but in the end... I'm pretty happy with it.
Squiggle Echoing and Six Petal Medallion

Instead of quilting an all over pattern on this quilt, I decided to quilt a squiggle echo in each triangle...

with a few 6 petal medallions thrown in. I really love the way this quilt turned out. It makes those triangles pop.

The back is pretty spectacular too. =)
Stippling, Feathered Flowers, Loops and Detail Quilting

Ok. So you might feel a little neck strain when you turn your head to see these pictures the right way. I admit that photography is NOT on my list of talents. =)
I love this quilt. I love that the stippling in the background and the detail in the pleats really make the dresses pop.

I did a simple loop pattern in the sashing and stop border... and a feathered flower in the outer border. I tried to keep the borders simple so the focus stays on the dresses.

Thursday, March 28, 2013
Sometimes, meandering is all it needs...

This is my spring quilt. The pattern is Abby Road's Ob La Di; the fabric is Heather Bailey's Nicey Jane. I wanted to compliment the vintage look by keeping the quilting super simple. I quilted a medium/small meander throughout the entire quilt. I love the results! I catch myself just staring at this quilt. I love it when a quilt turns out just the way you imagined it would.

Here is a close up of the quilting. Let me clarify the difference between meander and stipple. (This is just my opinion, not necessarily every quilters opinion.) A meander is a very basic quilting design... a stitch that "meanders" across the quilt. The only difference between a meander and a stipple is the size of the quilting. A meander is the design pictured above or bigger. Stippling is a meander stitch done very close together, tight and small. I will post a picture of stippling... eventually. =)
Monday, March 4, 2013
Quilting Patterns (Tossed Hearts, Swirled Hearts, Pebbling and Echoing)

This quilt has a tossed heart on the background...

pebbling on the letters, echoing in the background of each letter...

and swirled hearts in the border. This makes for a sweet Valentine's Day quilt. =)
Friday, March 1, 2013
Quilting Patterns (Vines, scrolls and daisy medallions)
I have costumers ask me all the time if I have pictures of the patterns I quilt with my Long Arm machine. So I thought it would be a good idea to start blogging some of the patterns I quilt. I hope these pictures are clear enough to see the stitching. =)
(Just click on the picture for a larger view.)
Scrolls and vines are popular patterns and used quite frequently...


A view from the back...

I plan to update quilting patterns on a weekly basis... so keep checking back for more examples of what I can do. Thanks so much for your support! --Holly
Subscribe to:
Posts (Atom)